11 尚品甄选-前台系统-搭建环境
1 前台系统-部署前端工程
本章讲解尚品甄选H5端介绍。
1.1 业务功能介绍
首页、商品分类查询、关键字查询、商品详情、注册、登录、购物车模块、用户收货地址管理、订单模块、支付...
项目演示地址:http://spzx.atguigu.cn/
1.2 系统架构
服务器端架构:SpringBoot3 + Spring Cloud + Spring Cloud Alibaba(Nacos/Sentinel) + MyBatis + Redis
前端架构:uni-app
1.3 前端H5开发说明
前端H5部分我们不需要开发,我们只需要根据接口文档开发微服务接口,然后对接到写好的前端H5即可
导入课程资料:h5
部署spzx-h5:
1、docker部署nignx
#拉取镜像
docker pull nginx:latest
#运行nginx镜像
docker run -d -p 80:80 \
--name nginx-spzx \
-v nginx_html:/usr/share/nginx/html \
-v nginx_conf:/etc/nginx/ \
-v nginx_logs:/var/log/nginx nginx
# nginx-spzx容器的管理命令
docker start nginx-spzx # 启��动容器
docker stop nginx-spzx # 关闭容器
docker rm nginx-spzx # 删除容器
#使用浏览器访问测试:http://ip
2、部署spzx-h5
删除/var/lib/docker/volumes/nginx_html/_data目录下的文件,将h5目录下的文件上传到该目录下。
浏览器访问:http://ip,打开手机模式
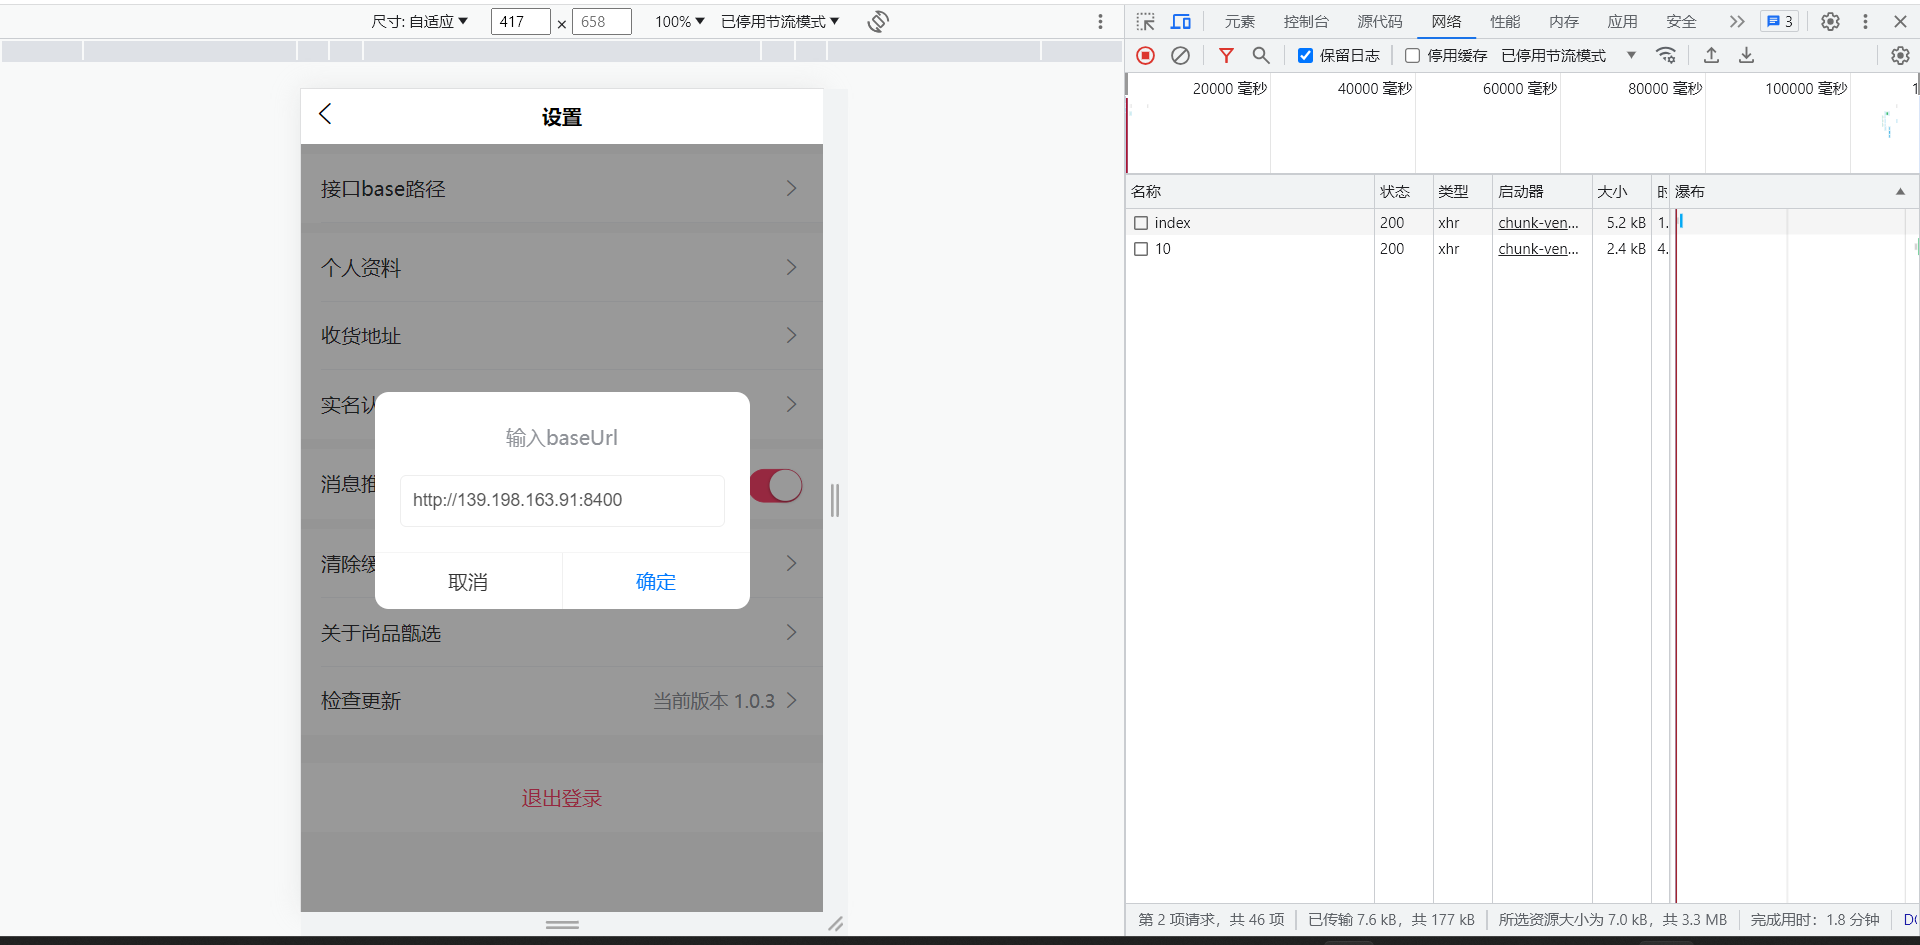
3、H5调用本地接口设置
我的 => 设置 =》 接口base路径,改为本地网关地址:http://IP:端口
注意:http://139.198.163.91:8400为云�服务接口地址
2 前台系统-搭建后端工程
本章讲解在spzx-parent基础上搭建尚品甄选H5端微服务开发环境。
2.1 项目结构说明
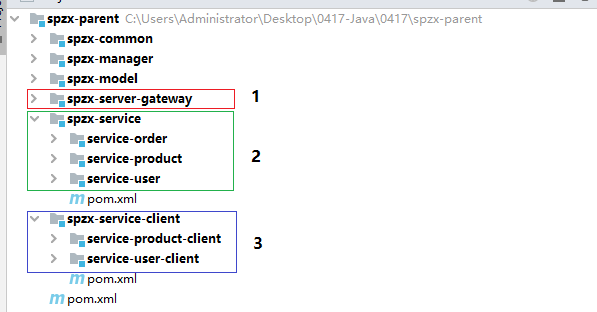
尚品甄选H5端微服务项目结构如下所示:
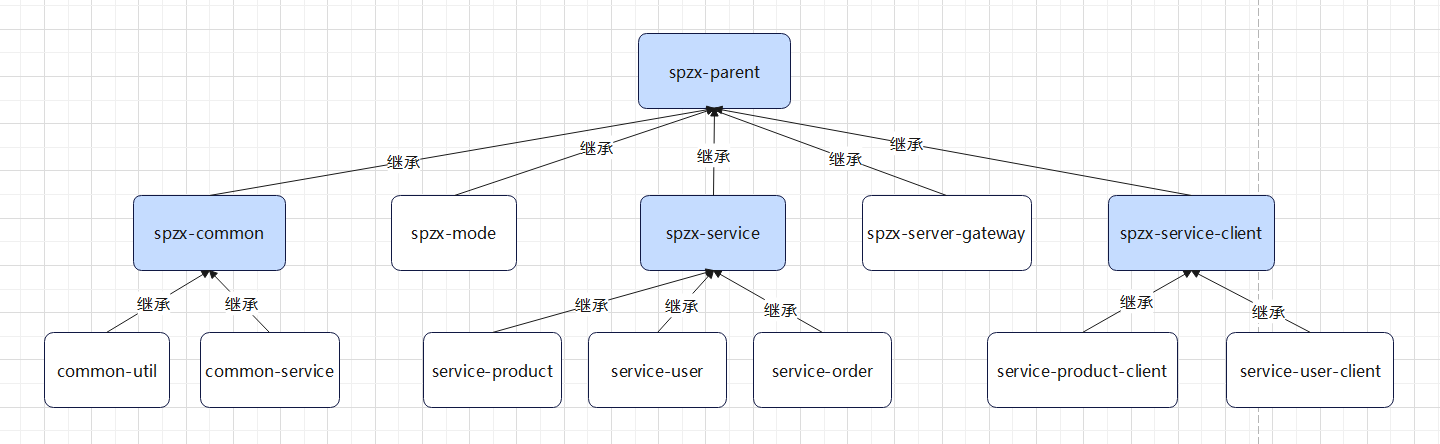
模块说明:
spzx-parent: 尚品甄选项目的父工程,进行项目依赖的统一管理,打包方式为pom
spzx-common: 尚品甄选项目公共模块的管理模块
common-util: 工具类模块
common-service:公共服务模块
spzx-model: 尚品甄选项目实体类模块
spzx-manager: 尚品甄选项目后台管理系统的后端服务(忽略、前面已讲)
spzx-server-gateway: 尚品甄选项目的网关
spzx-service: 尚品甄选微服务模块的父工程
service-product:商品微服务模块
service-user:用户微服务模块
service-order:订单微服务模块
spzx-service-client: 尚品甄选微服务模块远程调用接口的父工程
service-product-client:商品微服务远程调用接口模块
service-user-client:用户微服务远程调用接口模块
2.2 模块依赖说明
模块之间的依赖关系如下图所示:
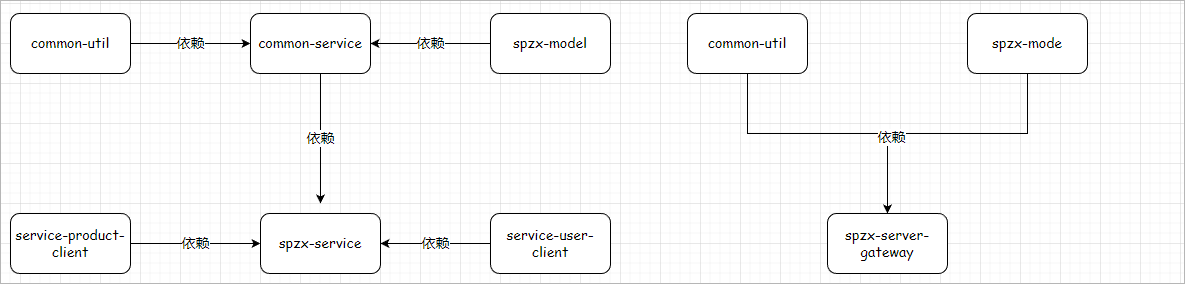
对应说明:
1、common-service依赖common-util、spzx-mode
2、spzx-service依赖common-service、service-product-client、service-user-client
3、spzx-server-gateway依赖common-util、spzx-mode
2.3 环境说明
本次项目开发的时候所使用的软件环境版本如下所示:
| 软件名称 | 版本说明 |
|---|---|
| jdk | jdk17 |
| spring boot | 3.0.5 |
| spring cloud | 2022.0.2 |
| spring cloud alibaba | 2022.0.0.0-RC2 |
| redis | 7.0.10 |
| mybaits-spring-boot-starter | 3.0.1 |
| mysql | 8.0.29 |
| idea | 2022.2.2 |
| nacos server | 2.2.1 |
| sentinel dashboard | 2.0.0-alpha-preview |
2.4 项目模块创建
2.4.1 spzx-parent
添加微服务依赖:
<properties>
    ...

    <cloud.version>2022.0.2</cloud.version>
    <alibaba.version>2022.0.0.0-RC2</alibaba.version>
    <alipay.version>4.8.73.ALL</alipay.version>
</properties>

<!-- 管理依赖,版本锁定 -->
<dependencyManagement>

    <dependencies>
        <dependency>
            <groupId>org.springframework.cloud</groupId>
            <artifactId>spring-cloud-dependencies</artifactId>
            <version>${cloud.version}</version>
            <type>pom</type>
            <scope>import</scope>
        </dependency>
        <dependency>
            <groupId>com.alibaba.cloud</groupId>
            <artifactId>spring-cloud-alibaba-dependencies</artifactId>
            <version>${alibaba.version}</version>
            <type>pom</type>
            <scope>import</scope>
        </dependency>
        <!--导入支付宝支付sdk-->
        <dependency>
            <groupId>com.alipay.sdk</groupId>
            <artifactId>alipay-sdk-java</artifactId>
            <version>${alipay.version}</version>
        </dependency>

        ...
    </dependencies>
</dependencyManagement>
2.4.2 spzx-service
在spzx-parent下面创建该子模块spzx-service,并导入如下依赖:
<dependencies>

    <dependency>
        <groupId>org.springframework.boot</groupId>
        <artifactId>spring-boot-starter-web</artifactId>
    </dependency>

    <dependency>
        <groupId>com.atguigu</groupId>
        <artifactId>common-service</artifactId>
        <version>1.0-SNAPSHOT</version>
    </dependency>

    <!-- mybatis的起步依赖 -->
    <dependency>
        <groupId>org.mybatis.spring.boot</groupId>
        <artifactId>mybatis-spring-boot-starter</artifactId>
    </dependency>

    <!-- mysql驱动 -->
    <dependency>
        <groupId>mysql</groupId>
        <artifactId>mysql-connector-java</artifactId>
    </dependency>

    <dependency>
        <groupId>org.springframework.boot</groupId>
        <artifactId>spring-boot-configuration-processor</artifactId>
        <optional>true</optional>
    </dependency>

    <dependency>
        <groupId>com.github.pagehelper</groupId>
        <artifactId>pagehelper-spring-boot-starter</artifactId>
        <version>1.4.3</version>
    </dependency>

    <!-- 服务注册 -->
    <dependency>
        <groupId>com.alibaba.cloud</groupId>
        <artifactId>spring-cloud-starter-alibaba-nacos-discovery</artifactId>
    </dependency>

    <!-- 流量控制 -->
    <dependency>
        <groupId>com.alibaba.cloud</groupId>
        <artifactId>spring-cloud-starter-alibaba-sentinel</artifactId>
    </dependency>

</dependencies>
注意:删除src目录
2.4.3 service-product
- 在spzx-service下面创建子模块service-product
- 在service-product下创建application.yml、application-dev.yml文件,文件的内容如下所示:
application.yml
spring:
  profiles:
    active: dev
application-dev.yml
server:
  port: 8511

spring:
  application:
    name: service-product
  cloud:
    nacos:
      discovery:
        server-addr: localhost:8848
  datasource:
    type: com.zaxxer.hikari.HikariDataSource
    driver-class-name: com.mysql.cj.jdbc.Driver
    url: jdbc:mysql://localhost:3306/db_spzx?characterEncoding=utf-8&useSSL=false&allowPublicKeyRetrieval=true
    username: root
    password: root

mybatis:
  config-location: classpath:mybatis-config.xml
  mapper-locations: classpath:/mapper/*/*.xml
- 导入课程资料中提供的:logback-spring.xml和mybatis-config.xml配置文件,
- 修改logback-spring.xml输出路径:
<property name="log.path" value="D://logs//service-product//logs" />
- 启动类创建
package com.atguigu.spzx.product;

@SpringBootApplication
public class ProductApplication {

    public static void main(String[] args) {
        SpringApplication.run(ProductApplication.class, args);
    }

}